Easy, no sew infant car seat blanket

It can be tough to know what to dress babies in with the cold weather, especially as thick padded snow suits are not recommended for use in a car seat. And blankets shouldn’t go under the straps and when they are laid on top they can be kicked off. So how do you keep baby warm?

It’s easy! (in every sense!)

You will need:

  • A piece of fleece at least 30 x 40 inches (I cut up one of the really cheap IKEA fleece blankets which only costs £1.50! And now I have more fleece left over for another project)
  • Scissors
  • Tape measure

Cut out a rectangle which measures at least 40 inches wide, by 30 inches high. If you want to get a little bit fancy you can round the corners like I did, but it makes absolutely no difference to the final thing!

Then fold the blanket in half vertically to make a rectangle of 20 x 30 inches. Half way up the blanket, on the fold, cut a straight line in from the edge, through both layers, 1.5 inches long (so when the blanket is unfolded the hole is 3 inches wide). This is the hole for the clip part of the seatbelt to go through (does that bit have a proper name? Am I just having a major baby brain moment?!).

Feed the clippy bit through the hole on your baby’s car seat. You’ll probably find there’s a little fold over needed at the top edge of the blanket under the shoulder straps, but it leaves room to grow!

2015-02-10 15.46.13

Then find yourself an adorable baby and pop them in it!

2015-02-10 15.47.11

As you can see you strap them in before you cover them with the blanket. Then fold the blanket like an old fashioned swaddle, folding over the excess at the feet, and you’ll have one toasty little baby all ready to go!

2015-02-10 15.47.58

He is never that happy to go in his car seat when it’s actually going in the car… How can he tell the difference?!?

Baby update!

Baby boy is nearly 6 weeks old. Crazy! He’s going through his first developmental leap and suddenly when he is awake you can see he is taking in his surroudings and really looking at things. It’s almost like suddenly there’s a proper little person in there, taking an interest in everyone and everything! He loves to look at his big brother, and turns his head towards him when he hears his voice.

It does mean he has been a bit grumpy in the evenings, but lots of skin-to-skin cuddles and mummy milk seems to do the trick, as well as lots of time in the wrap during the day. Luckily that means I’m still able to get (some!) housework and cooking done as well as entertaining big brother.

We’ve also had our first real smiles and I finally managed to get one on camera today!

image

I *think* big brother got the first official smile, but daddy and I definitely got some last Friday and have done every day since 🙂

He looks so much like his big brother that I did a little experiment to prove how similar they are. I used a photo of big brother at this age and dressed baby in the same jumper and lay him on his changing mat. It’s almost a little freaky just how similar they are!

image

image

That’s little brother first, and big brother second, but I think I’ll have to keep in mind who had which changing mat or I’ll never remember! It’ll be really interesting to see how similar they are as they grow up. Will I end up with a little pair of clones?!

Newborn photoshoot with Hillson Photography

The mum of a friend of mine from playgroup is a photographer, so we took baby along to get some photos taken when he was 2 1/2 weeks old. Ideally babies should be even younger than this as they go into a deeper sleep and are less easily disturbed so they can be posed.

But we have a baby who, even now at 5 1/2 weeks, sleeps a lot (like 20 hours a day) so we thought it’d be ok. We followed our instructions and woke him up over an hour before our shoot for a feed and kept him awake so that he’d be nice and sleepy when we arrived.

When we got there Simone had us strip him down to his nappyand give him a feed to help him go to sleep. Unfortunately he was having none of it and was the most wide awake he had ever been! Unfortunately that was the theme of the whole shoot, but Simone was incredibly patient and, in the two, very brief moments he did shut his eyes, managed to get some gorgeous photos:

Oran-01

Oran-02

Isn’t he adorable?! If SUPER WIDE AWAKE! He was awake for 4 hours in the end. 4 hours! That’s still by far the longest he has been awake in his entire life! Aah well, never work with children and animals, right?

Despite our awkward baby, we had a great time with Simone and I can highly recommend her if you are looking for a photographer in Edinburgh. Her new studio is opening soon in Davidsons Mains, and to celebrate she is offering 20% off everything booked for February! I particularly like the look of the cake smash sessions she does for babies first birthdays, it looks like so much fun!

You can check out her website here and her facebook page here. Why not pop over and take a look at her work? And if you like what you see just remember, sharing’s caring! 🙂

Knitting, knitting, knitting and an update

Oh man, what a week! And unfortunately not all in a good way.

First of all we all have the lurgy in our house, which isn’t so much fun. For me especially as on Sunday it migrated to my sinuses and I’ve spent the last three days feeling like I’ve been kicked in the face 😦 (pause for sympathy…!) According to the doctor, my nose looks “all swollen and haemorrhagic-y”. I mean wow. It must have taken years of studying to be able to come up with a diagnosis like that! He he, well at least it cheered me up a bit!

Also in the middle of last week our new boiler decided that it wasn’t cold enough for us to want heating or hot water and so decided to stop providing us with both. Considering it’s less than a year old we were less than impressed! Luckily it was actually fairly straightforward to fix, but it did require a visit from the manufacturer, who couldn’t come until Monday. So we had a weekend in the cold, when all I wanted was a nice hot bath! Luckily we have an electric shower though so we didn’t have to also brave cold showers.

But on a more positive note I had my 28 week midwife check up yesterday and got to listen in to baby’s heartbeat. Baby wasn’t cooperating and kept wriggling away from the doppler, but I can’t really blame him for not wanting poked and prodded! Everything is going really well, baby is very active and seems to like to party. It’s very exciting to be in the third trimester now and on the home stretch! I think this is my favourite time of pregnancy: when I’m big enough to very obviously be pregnant, far enough along to feel lots of movement, and still not so big that simple tasks are getting difficult (I’m thinking specifically of bending over and putting on socks!).

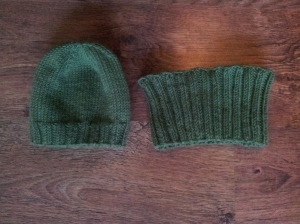
I’ve also been making very good progress with my knitting to-do list. The matching hats are coming along nicely, although they did have a slight change of plan. It turned out that I didn’t actually have enough of that lovely green bamboo yarn I was using to finish off the hat for young sir. But thanks to the stretch in the ribbing and the fact that he has quite a big head, it is large enough to fit me as a headband. So poor baby will have to match me instead!

2014-10-07 14.31.43

And this means that I’ve started on a new, new hat for young sir using this slightly odd yarn that I found in a charity shop. Bet you can’t guess what it’s made from! Anyone care to have a try?

2014-10-07 14.32.21

I’ve also finished a little carseat baby blanket using this funny, bumpy yarn:

2014-10-07 14.33.47

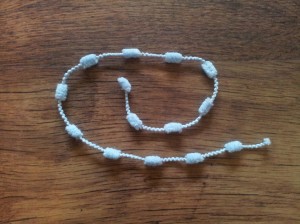
It knits up pretty quickly once you get used to it. You have to use small needles (I used 2.5mm, but you could propbably use 3mm too) and do one stitch between each bump. I did the whole thing in garter stitch (knit every row) and the only issue I had was when it came to casting off. I couldn’t use the usual method as it made the final row too tight so I had to be inventive and make up my own method. But I think it worked quite well 🙂

2014-10-07 14.33.13

Although it’s quite small, that little blanket is actually 3 balls of yarn! I’m glad I bought 3 otherwise I’m not sure what else I would have been able to make with it.

And last night, thanks to young sir having an uncharacteristically early night, I managed to finish my shawl! Woo hoo! I still need to weave in the ends and block it to bring out the lace pattern but I’m pretty pleased with how it came out 🙂

2014-10-07 14.34.39

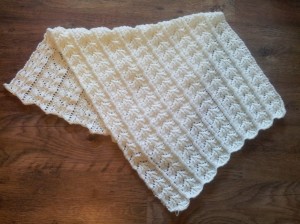
Once it’s finished I’ll do another update and let you see how it turned out. I’ve never blocked something so big before so I’m hoping it will all come out nicely, although I’m not really sure how long it’ll take!

And I realise I told you all I was excited about dying my hair and then never showed you the finished look, but honestly I look like death warmed up right now so it’s not a great time for taking close up pictures of my face! I’m really pleased with the hair though and as soon as I look healthier I will show you!

Matching hats, and tips for knitting magic loop

image

OK, be honest, is this too much? Matching hats for young sir and new baby. I think they’ll look adorable. Well, I hope they’ll look adorable because they will be wearing their new hats come winter! (And yes, that may be a clue about the flavour of my bump!)

As I was knitting away in the park this afternoon, I thought it might be useful to pass on some tips I’ve picked up to make magic loop knitting a bit easier. If you’re unfamiliar with it, magic loop is a technique to use a long circular needle for a project with a small circumference. For example I’m using a 31 inch long needle to make baby and toddler hats. It is an alternative to using multiple double pointed needles.

I’m not going to go through the whole technique as there are already plenty of good instructional videos on YouTube, these are just my tips to make it a bit easier. I’m making the basic baby hat from Mama’s Stitchery Projects.

Tip 1:

When casting on, split your total number of stitches up into three even sections and place a stitch marker after each section (3 markers total). Now at each of the two markers in the centre of the work (the third marker is at one end) pull half of the excess length of the needle cable through, so that it looks like this:

image

See the two loops and the stitch markers? This is what your work should look like each time you finish one section and before starting the next. I know some videos say two sections is enough but I found that far too awkward, three gave me much more freedom of movement with the needles.

Tip 2:

Always remember to transfer your stitch markers! It’s so much easier to slip your marker than to have to count a third of the stitches each time you finish a section. Trust me 😉

image

Tip 3:

I find it easiest to put my left pinky finger through the loop of my needle while I’m working:

image

Otherwise I feel like my fingers are getting in the way, and it stretches the last few stitches too much.

So there you go, my three top tips for working with magic loop! I hope you find them helpful 🙂

Oh, and if you’re concerned I was being neglectful and ignoring young sir at the park, fear not. He got too excited at the prospect of going to play and fell asleep en route! Oh well!

image

Testing the waters

OK, so I could really do with a little input from you lovely lot, if you don’t mind? I have been thinking about this for a while and I think I would like to dip my toes into the world of selling online patterns. The first of my patterns I’m thinking of digitising is the poncho and cape pattern, as it is a great baby project, it’s fairly straightforward and could be sewn by beginners.

DSC_0513DSC_0509DSC_0453DSC_0441

What I would like to know is if you think this is the type of pattern you, or someone you know, might be interested in and what sizes you would like to see it available in. I have it from new baby up to age 2 currently but I could increase the upper age limit if people are interested.

If I get a good response then I am fairly determined to go ahead with my plan, in which case I shall shortly be putting out a call for pattern testers, so if that is something you think you might be interested in doing then watch this space!

Please leave me a comment here or on my facebook page letting me know what you think, it would be very much appreciated! Thank you 🙂

Deluxe Kilt Package

I’m very excited to announce that I have introduced a new product to my little shop, and even more pleased to say that it is one for the boys! It aways seems that boys are somewhat overlooked in the world of handmade, and hopefully this will help change that, just a little!

So here it is: the deluxe kilt package! It comes with a kilt, waistcoat, tie or bowtie, and flashes, so all you need to finish the outfit is a shirt, socks and shoes. The kilt is made from polyviscose tartan, and not wool, which means it’s much softer against the skin (for the little one wearing it), and it’s machine washable (for us parents who have to consider such things!). It fastens with a button and a popper, both of which can be moved along the inner front panel to extend the life of the kilt. The inside of the kilt is lined over the pleats to make it more comfortable and to keep the pleats sitting where they should. And the waistband is finished in lovely soft cotton so that it won’t rub on baby’s delicate skin. There are also more pleats than in my basic kilt, which means that it is a little heavier and will sit better on even wriggly toddlers!

  DSC_0594DSC_0593DSC_0592

It comes with a waistcoat made in a complimentary colour, picked from the colours in the tartan. The lady I made this outfit for asked for a green waistcoat and I chose this bottle green cotton which nicely coordinated with the dark green in the Dress Gordon tartan. The front panels of the waistcoat are lined with medium weight interfacing to give them a bit more structure, and there is a tie at the back to give it a little adjustment. The waistcoat and the kilt both use the same celtic buttons.

DSC_0595DSC_0597

This outfit came with a pre-tied tie, but the package is also available with a pre-tied or self-tying bowtie. The tie is made from the same tartan as the kilt, and fastens at the back of the neck using a popper. This means that it will come undone if pulled hard so that it isn’t a choking hazard.

DSC_0598

When I had finished these three pieces I couldn’t resist laying it all out together to see how it looked. And I have to say I was pretty pleased, even if I do say so myself!

DSC_0602

The deluxe kilt package is available through my facebook page or you can contact me with any enquiries. Prices start from £45 for the complete package

Where it all started: The baby poncho!

I came up with the idea of starting my business after a present for a friend received such positive feedback. She had been complaining about the difficulty of fighting her newborn daughter’s arms through her jacket sleeves, but said that the ponchos she had seen were all so expensive she couldn’t justify spending so much money when it would last such a short time. So I decided to see what I could whip up. I did a little maths and drafted a pattern then headed off to the fabric shop, one of my favourite outings!

For this first poncho I went for a gorgeous cream coloured dimple minky and lined it with soft cotton jersey. If you’ve never come across minky before I can highly recommend it as the softest fabric I think I’ve ever felt. It’s perfect for cuddling… just like babies! Unfortunately I don’t have a good photo of that first poncho, but this cape is made from the extra fabric I bought that day:
DSC_0443
I gave my friend the poncho and everyone who saw it said nice things, which planted the seed of the idea for my business!

The next two ponchos I made were both as presents for little boys and looked like this:
DSC_0453
A lovely soft fleece lined flannel (brushed cotton for those not in the know!). Again they went down well so I decided that once my own little bundle was a bit bigger I would try my hand at making ponchos to sell.

So now I have a whole variety of ponchos and capes, with even more ideas swimming round in my head for new lines.

There are basic ponchos which are a single layer of fleece with the raw edges encased in bias binding, for boys and for girls:
DSC_0509DSC_0454DSC_0456DSC_0515

Reversible ponchos that tie round the waist:
DSC_0401DSC_0402

Tartan capes made from polyviscose (softer and easier to care for than woolen tartan) and lined with fleece, both with a hood:
DSC_0441
And without:
DSC_0513DSC_0511

And from there I then started making girls and boys clothes, and maternity and nursing wear. But that’s another story 😉