The best vegan strawberry ice cream

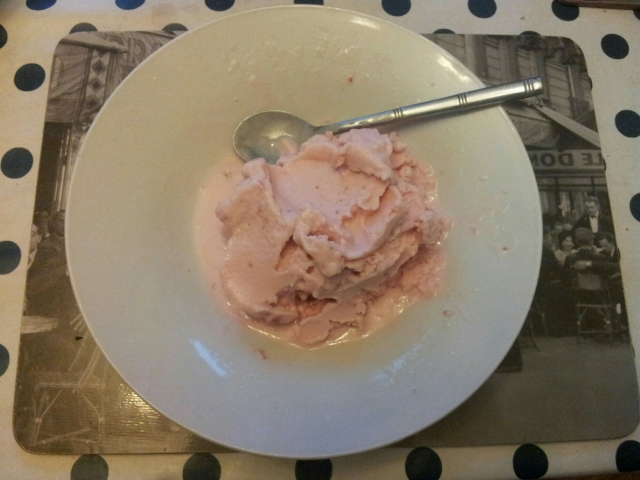
I know it’s a big claim, but man, this was delicious! You remember how much I loved the coffee ice cream? Well, this is better. So, so delicious 🙂

I’ve never been a huge fan of strawberry flavouring, usually because it’s never had anything to do with a real strawberry. But fresh strawberries have always been a favourite of mine, so I decided to experiment.

I used the same sweet cream base from the vegan vanilla ice cream, to which I added 12 medium/large mashed up strawberries. I just used a fork to mash them as the fruit released quite a lot of juice, but there were still enough pieces to give you a strawberry hit when you find one in your ice cream.

Into the machine it went and 20 minutes later out came a delicious, pink, fruity, summer treat. Definitely one to make again!

image

Vegan Coffee Ice Cream

Oh. My. Word. Where has this been all my life?! This recipe is creamy, delicious and, unlike some dairy-free ice creams, actually freezes well.

It starts with the sweet cream base I used for the vegan vanilla ice cream but with a slight variation:

Ingredients:

  • 1 cup soya cream
  • 1 cup soya milk (we use less soya milk in this recipe as there is liquid added with the coffee)
  • 1/2 cup sugar

Flavouring:

  • 2 double espressos (add more or less coffee depending how strong a coffee flavour you want, I found 1 double wasn’t enough though)

Add the milk, cream and sugar to a bowl and whisk to dissolve the sugar. Make the coffee, but make sure you let it cool before adding to the mixture to prevent it from curdling. I then added the mixture to my ice cream maker and let it do it’s thing, and voila! Delicious ice cream in less time than going to the shop to buy some 🙂

Note: I added some cracked coffee beans to the mix. I think this was a mistake though and I’m not going to do it again! I think if you had some chocolate coated coffee beans then these would be good added whole to the mix, but the cracked beans just got stuck in my teeth without adding much to the flavour. Also this turned out to be a double quantity for my ice cream maker so we had to have it on consecutive nights… The hardship!

Variation:

I am going to try the recipe again but vary it a little by using hazelnut milk and maybe add some chocolate chips to the mix. I’ll let you know how it tastes when I do!

Instant Banana Ice Cream

This is a firm favourite in our house as it is so simple to make and, as far as ice cream goes, actually pretty healthy. And the best part about it is it only uses 2, yes 2, ingredients, and you don’t even need an ice cream maker to make it as all you will use is your freezer and a food processor! You can also alter the proportions depending how how runny you want your finished ice cream to be. If you want it to be a firmer mix just add less liquid, and vice versa. Sounds pretty good, doesn’t it?!

“So what are the only 2 ingredients I need?” I hear you cry. Easy:

  • 1 banana per person (more if you want to of course!)
  • something liquid to help it blend, for example: cream, custard or milk (all either dairy or non-dairy, works well with both!)

To make the ice cream you need to first cover a baking tray with cling film and make sure you’ll have space to lay it flat in your freezer. Then skin the bananas and cut into thin slices. If you are doing this well in advance of when you want to eat it then the thickness of the slices doesn’t matter. If, like me, you decide to make it at the last minute you’ll need to slice thinly or it won’t freeze properly in time. Once sliced pop the tray in the freezer and leave it until you’re ready to serve as this is made at the last minute.

When you’re ready, set up your food processor and tip in the frozen slices of banana straight from the freezer. Because they’re so hard we need to add the liquid otherwise the machine would just bounce them around. There aren’t set proportions of the liquid as it will depend on the size of your bananas, how well frozen they are and how soft you want your ice cream. Using cream or custard will make a richer ice cream (ie fattier and more unhealthy!) than using milk, but the amount you need is relatively small so I say go for it! 😉 Start by adding about a tablespoon of liquid per banana then go from there. I always find it best to add a little, then more if it’s needed rather than over doing it!

Start by pulsing the mixture so that you don’t overwork your machine, stopping to add more liquid if needed. Once it starts to look more like lumpy ice cream than just frozen banana pieces you can turn the food processor on fully and keep blending until it’s completely smooth.

Serve immediately and enjoy, remembering that with all that banana it’s pretty much a health food… He he!

Vegan Vanilla Ice Cream

How about a little sweet treat for the weekend? This easy ice cream recipe is so good it will even appeal to the non-lactose intolerants amongst you! I made it for some friends last night and they didn’t even realise it was made with soya and not dairy. And as a bonus (I think) it doesn’t really store very well, so you’re forced to eat the whole batch! You could scale it down and make less but where’s the fun in that?!

The mixture is really easy. The sweet cream base only contains 3 ingredients, then 1 more is added to flavour it.

Sweet cream base:

  • 1 cup soya cream
  • 1 1/2 cups soya milk
  • 1/2 cup sugar

Flavouring:

  • 1/2 teaspoon vanilla extract

I have an ice cream maker (thank you Santa!) which makes up a batch in about 20 minutes. Amazing! So all I need to do is add all the ingredients to a large bowl, whisk to dissolve the sugar (either by hand or with an electric mixer), then pour the whole lot into the machine and wait for it to do its thing. We had it with some fresh raspberries and blueberries and it was delicious. It made enough for 4 of us to have about 2 scoops each. Enjoy!

Variation:

Instead of using soya cream and milk you could easily use any other kind of non-dairy cream, for example cashew makes a very nice ice cream!

No-Bake Date Cookies

This is an adaptation of a recipe which I found online that I have tweaked so that it’s more to my taste! They are very quick and easy to make, you don’t need to bake them, and they are perfect for toddlers (and parents!).

To make them you will need:

  • 1 cup of dates (stones removed)
  • 1/2 cup dessicated coconut, ground almonds, or a combination of the two. My favourite is a 50:50 mix
  • 1/2 cup porridge oats
  • 1/4 cup sunflower seeds
  • 1/4 cup raisins (or other dried fruit—try cranberries)
  • 3 tbsp Tahini paste (If you’ve never come across this, it is just crushed sesame seeds)
  • 3 tbsp maple syrup (or honey)
  • A pinch of salt

Line a baking sheet with non-stick baking parchment. Add all of the ingredients to a food processor and whizz it all up! Don’t overdo it, you don’t want to end up with a uniform paste—some chunks are good! Remove the blade and using a spoon take a blob of the mixture and rub it between your hands to create balls about an inch in diameter. Flatten these slightly into fat cookie shapes and place on the baking sheet. Refrigerate for at least an hour and then try not to eat the whole lot at once! If any of them do survive the initial munching then they are best stored in the fridge.

Enjoy!

DSC_0528